Руководство

Содержание
Предварительная подготовка установочного носителя
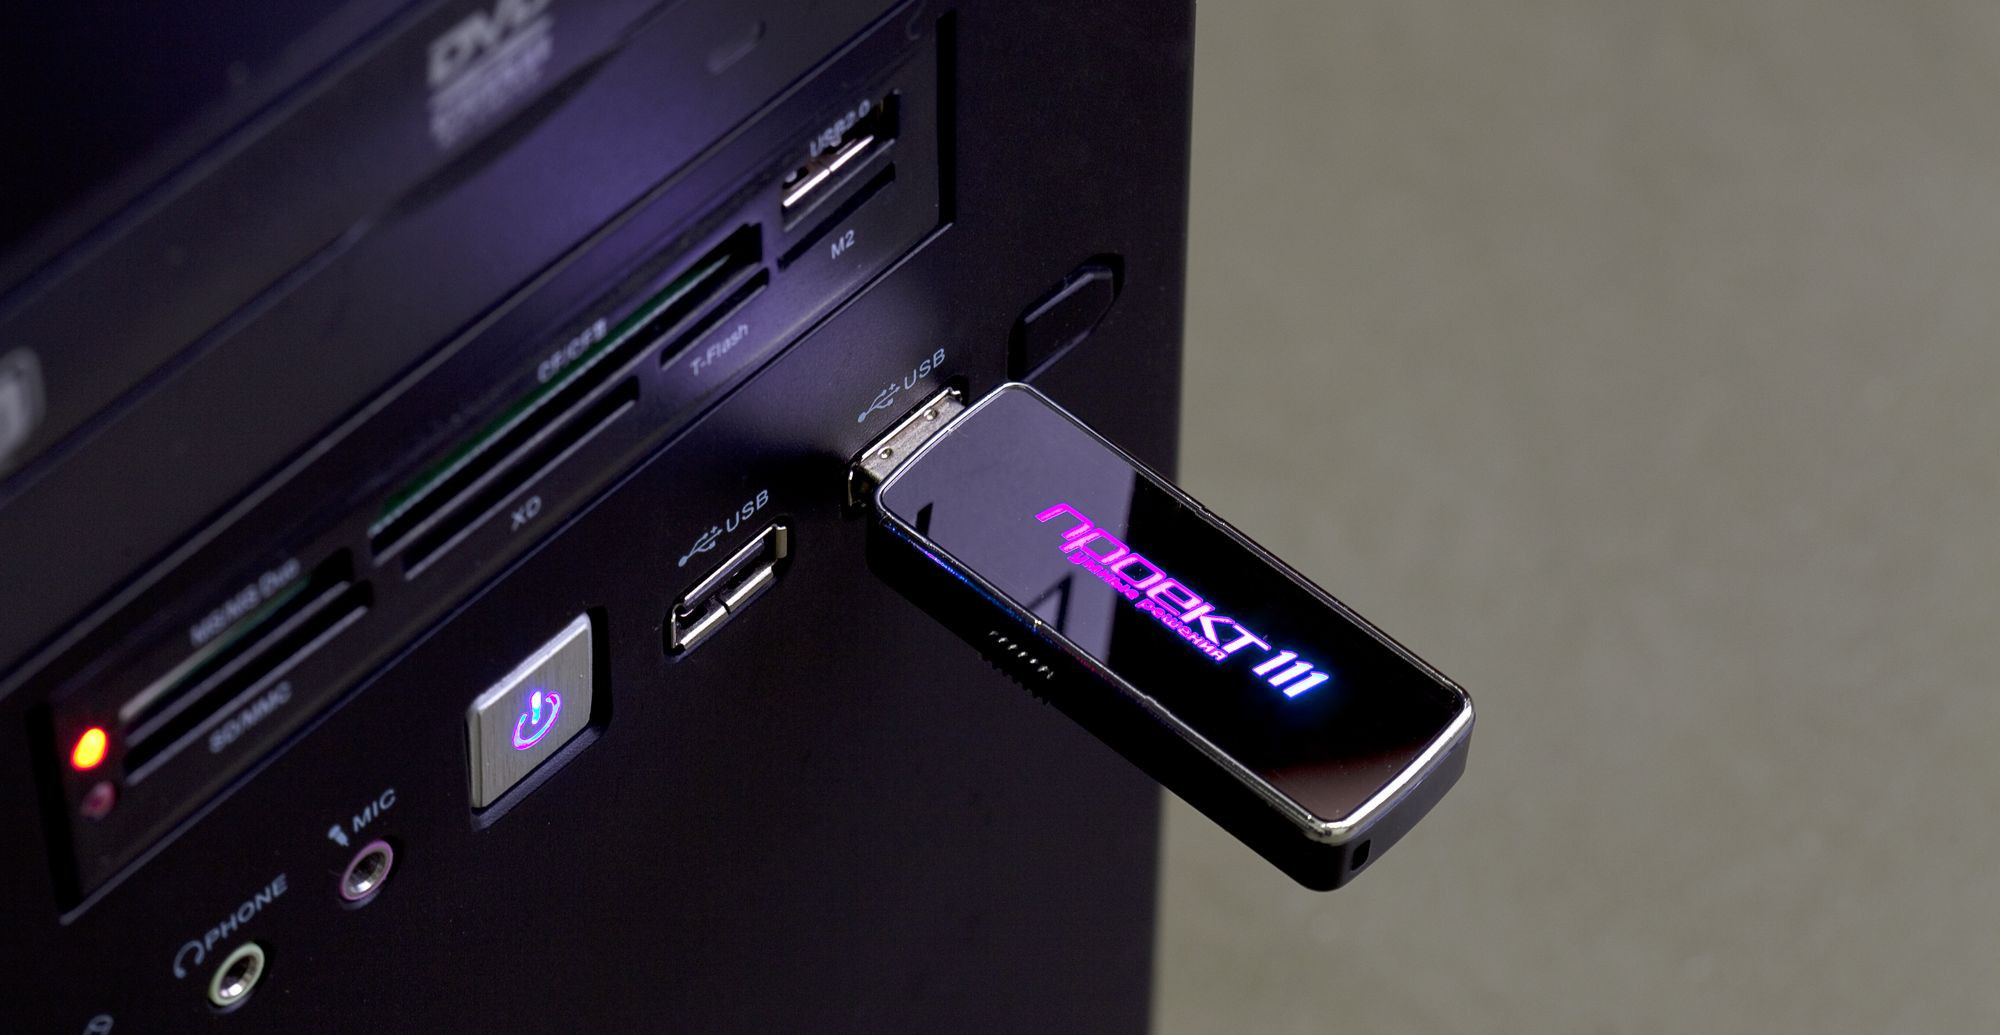
1. Вставьте в специальный порт устройство «USB-флэш-накопитель» объёмом минимум 8 гигабайт.
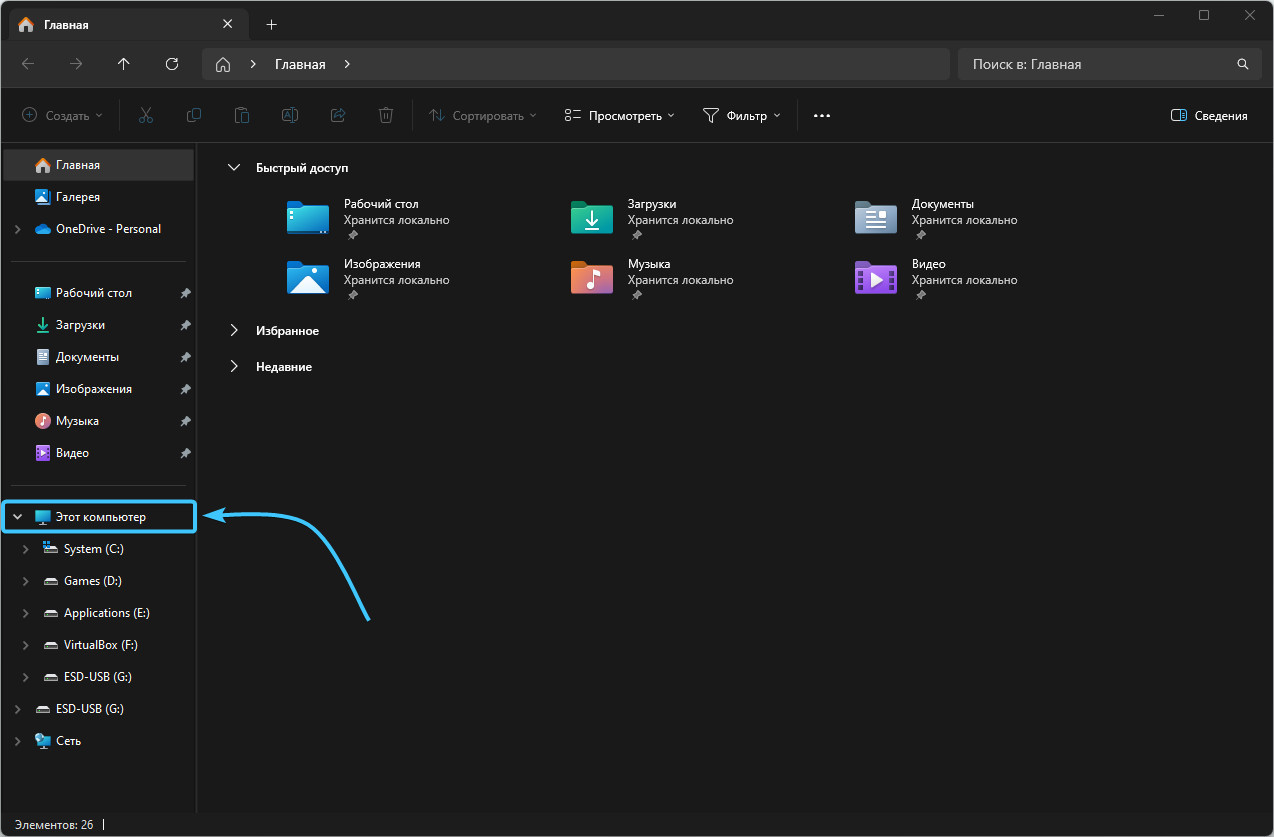
2. Откройте «Проводник» операционной системы «Windows». Далее откройте раздел «Этот компьютер».
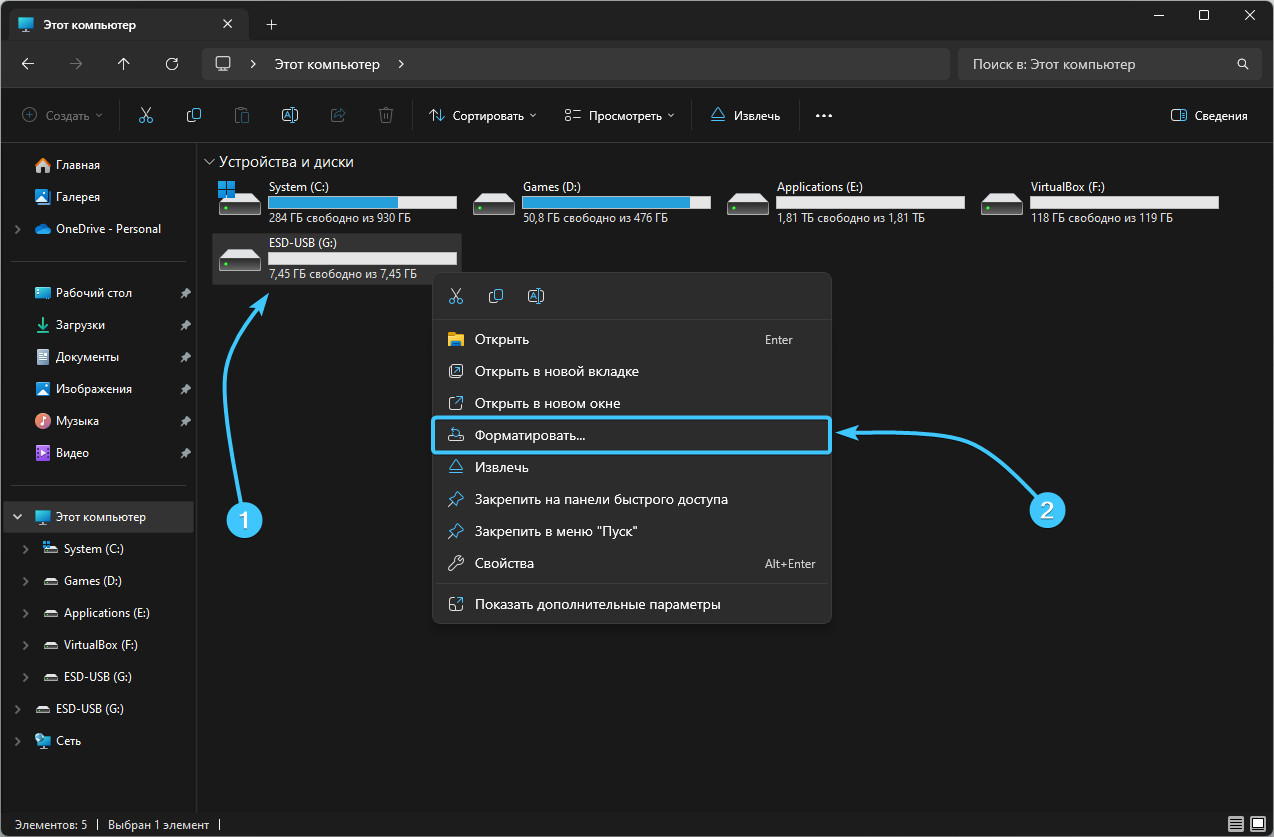
3. Отыщите накопитель и нажмите по нему правой кнопкой мыши. Нажмите кнопку «Форматировать».
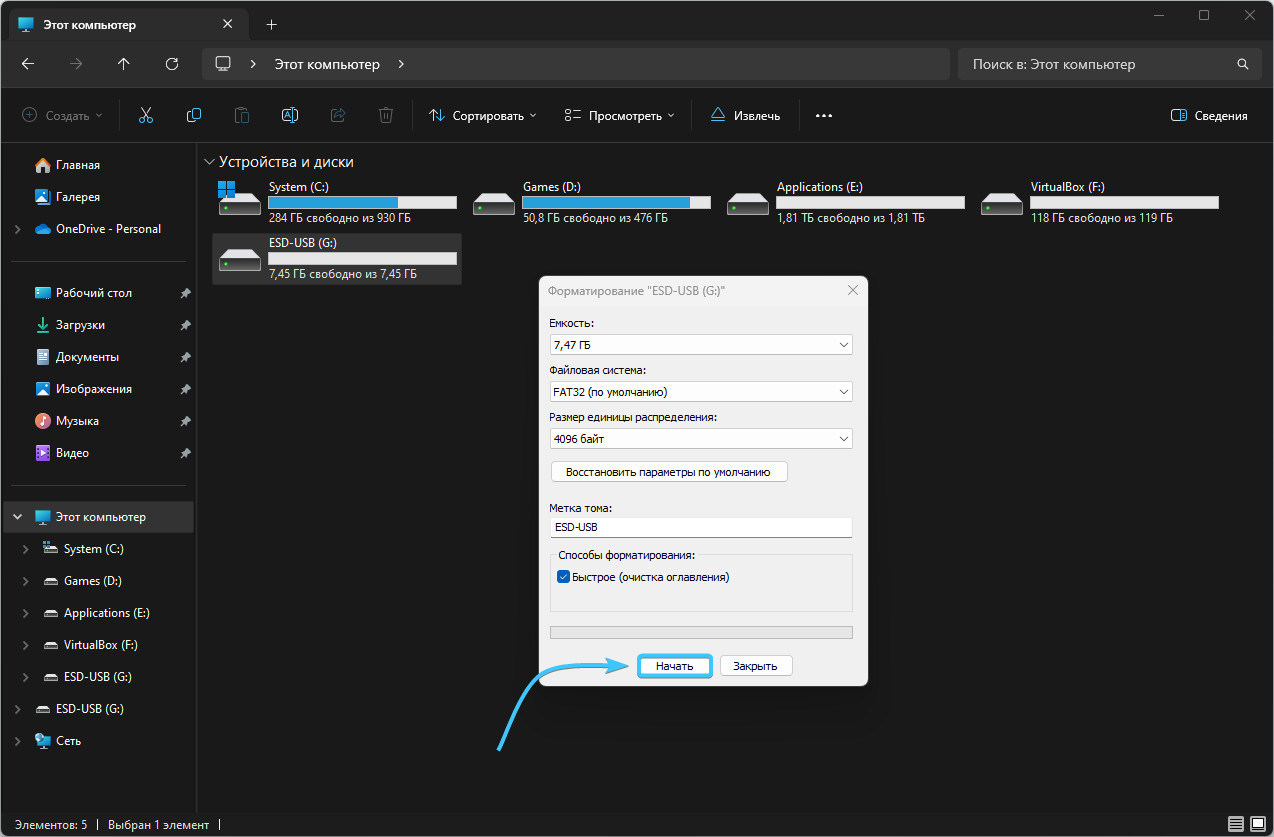
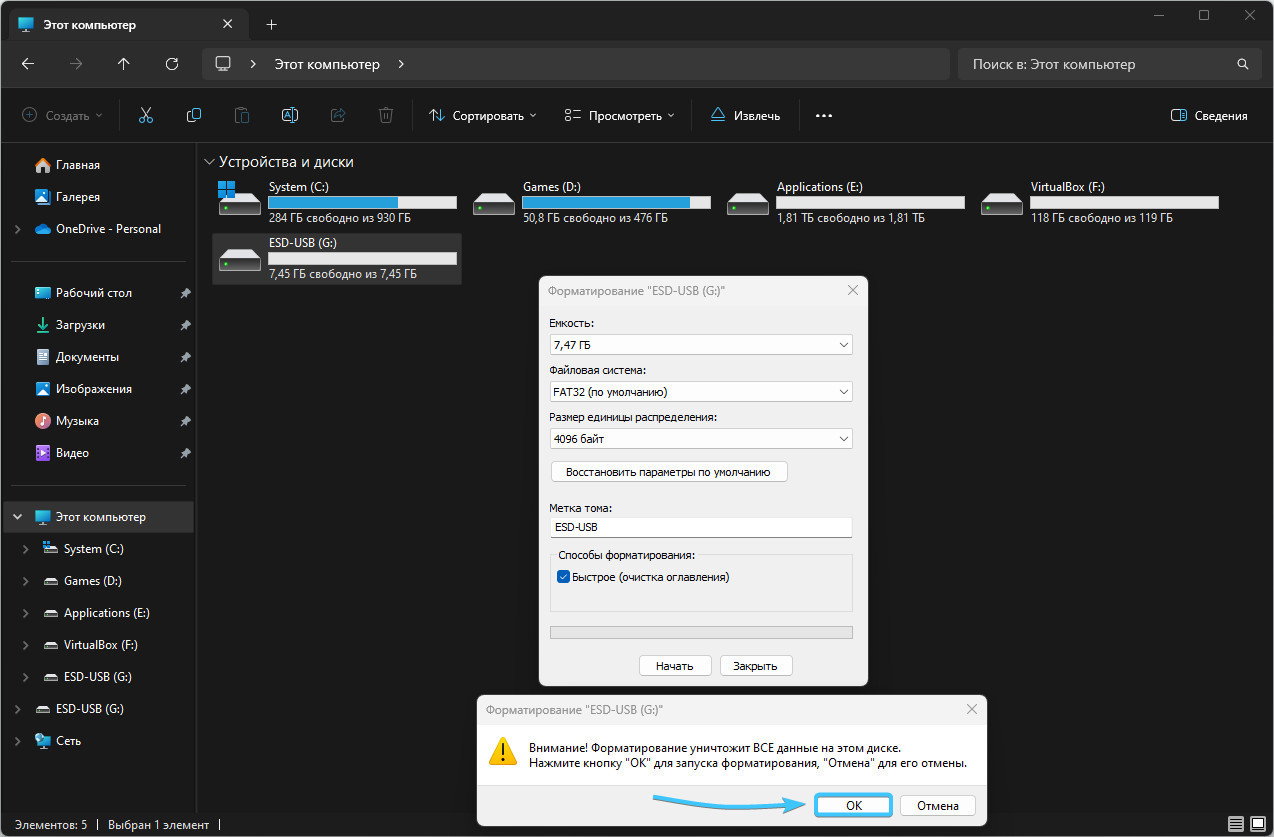
4. Появится новое окно. Какие-либо параметры менять не нужно. Просто нажмите кнопку «Начать».
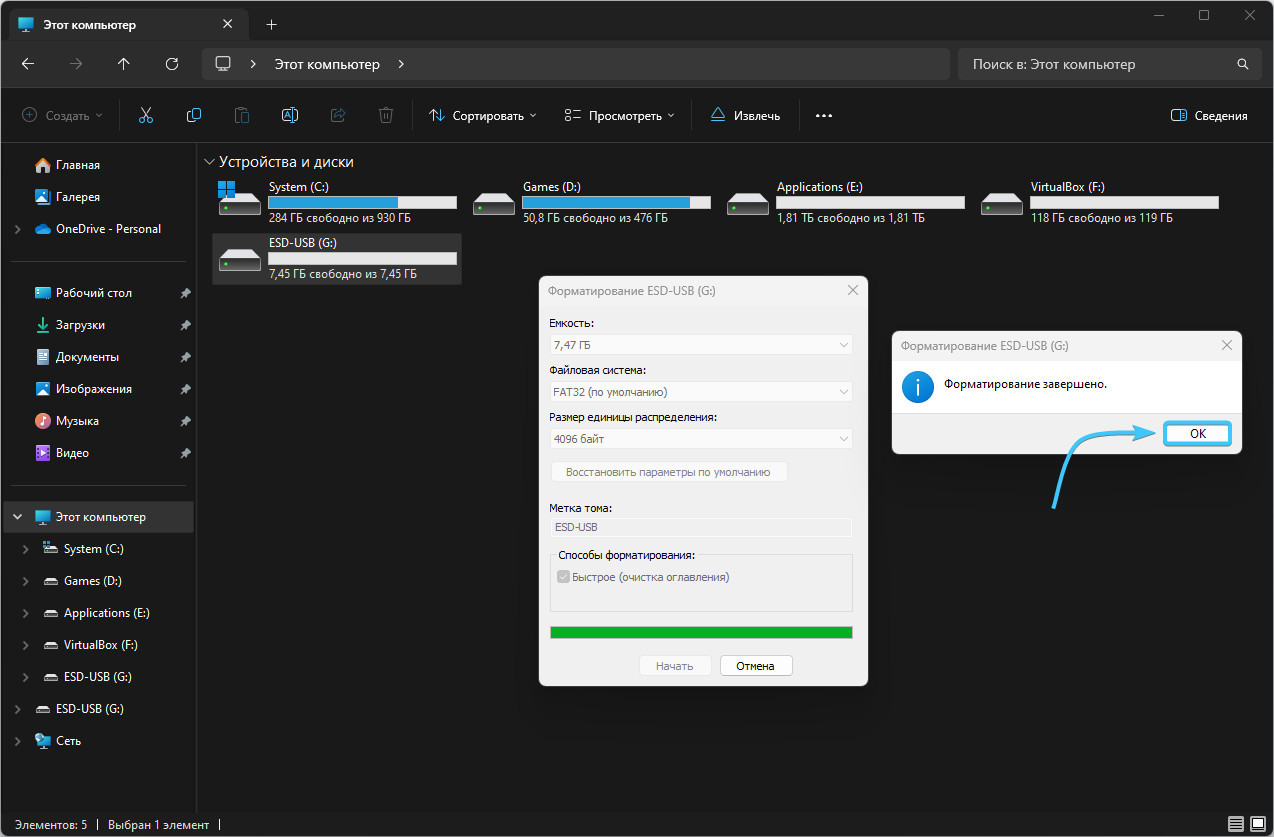
5. В появившемся окне нажмите кнопку «ОК» и дождитесь завершения процесса форматирования.
6. Появится уведомление о завершении процесса форматирования. Нажмите кнопку «ОК».
Установка образа «Windows» 10 на носитель
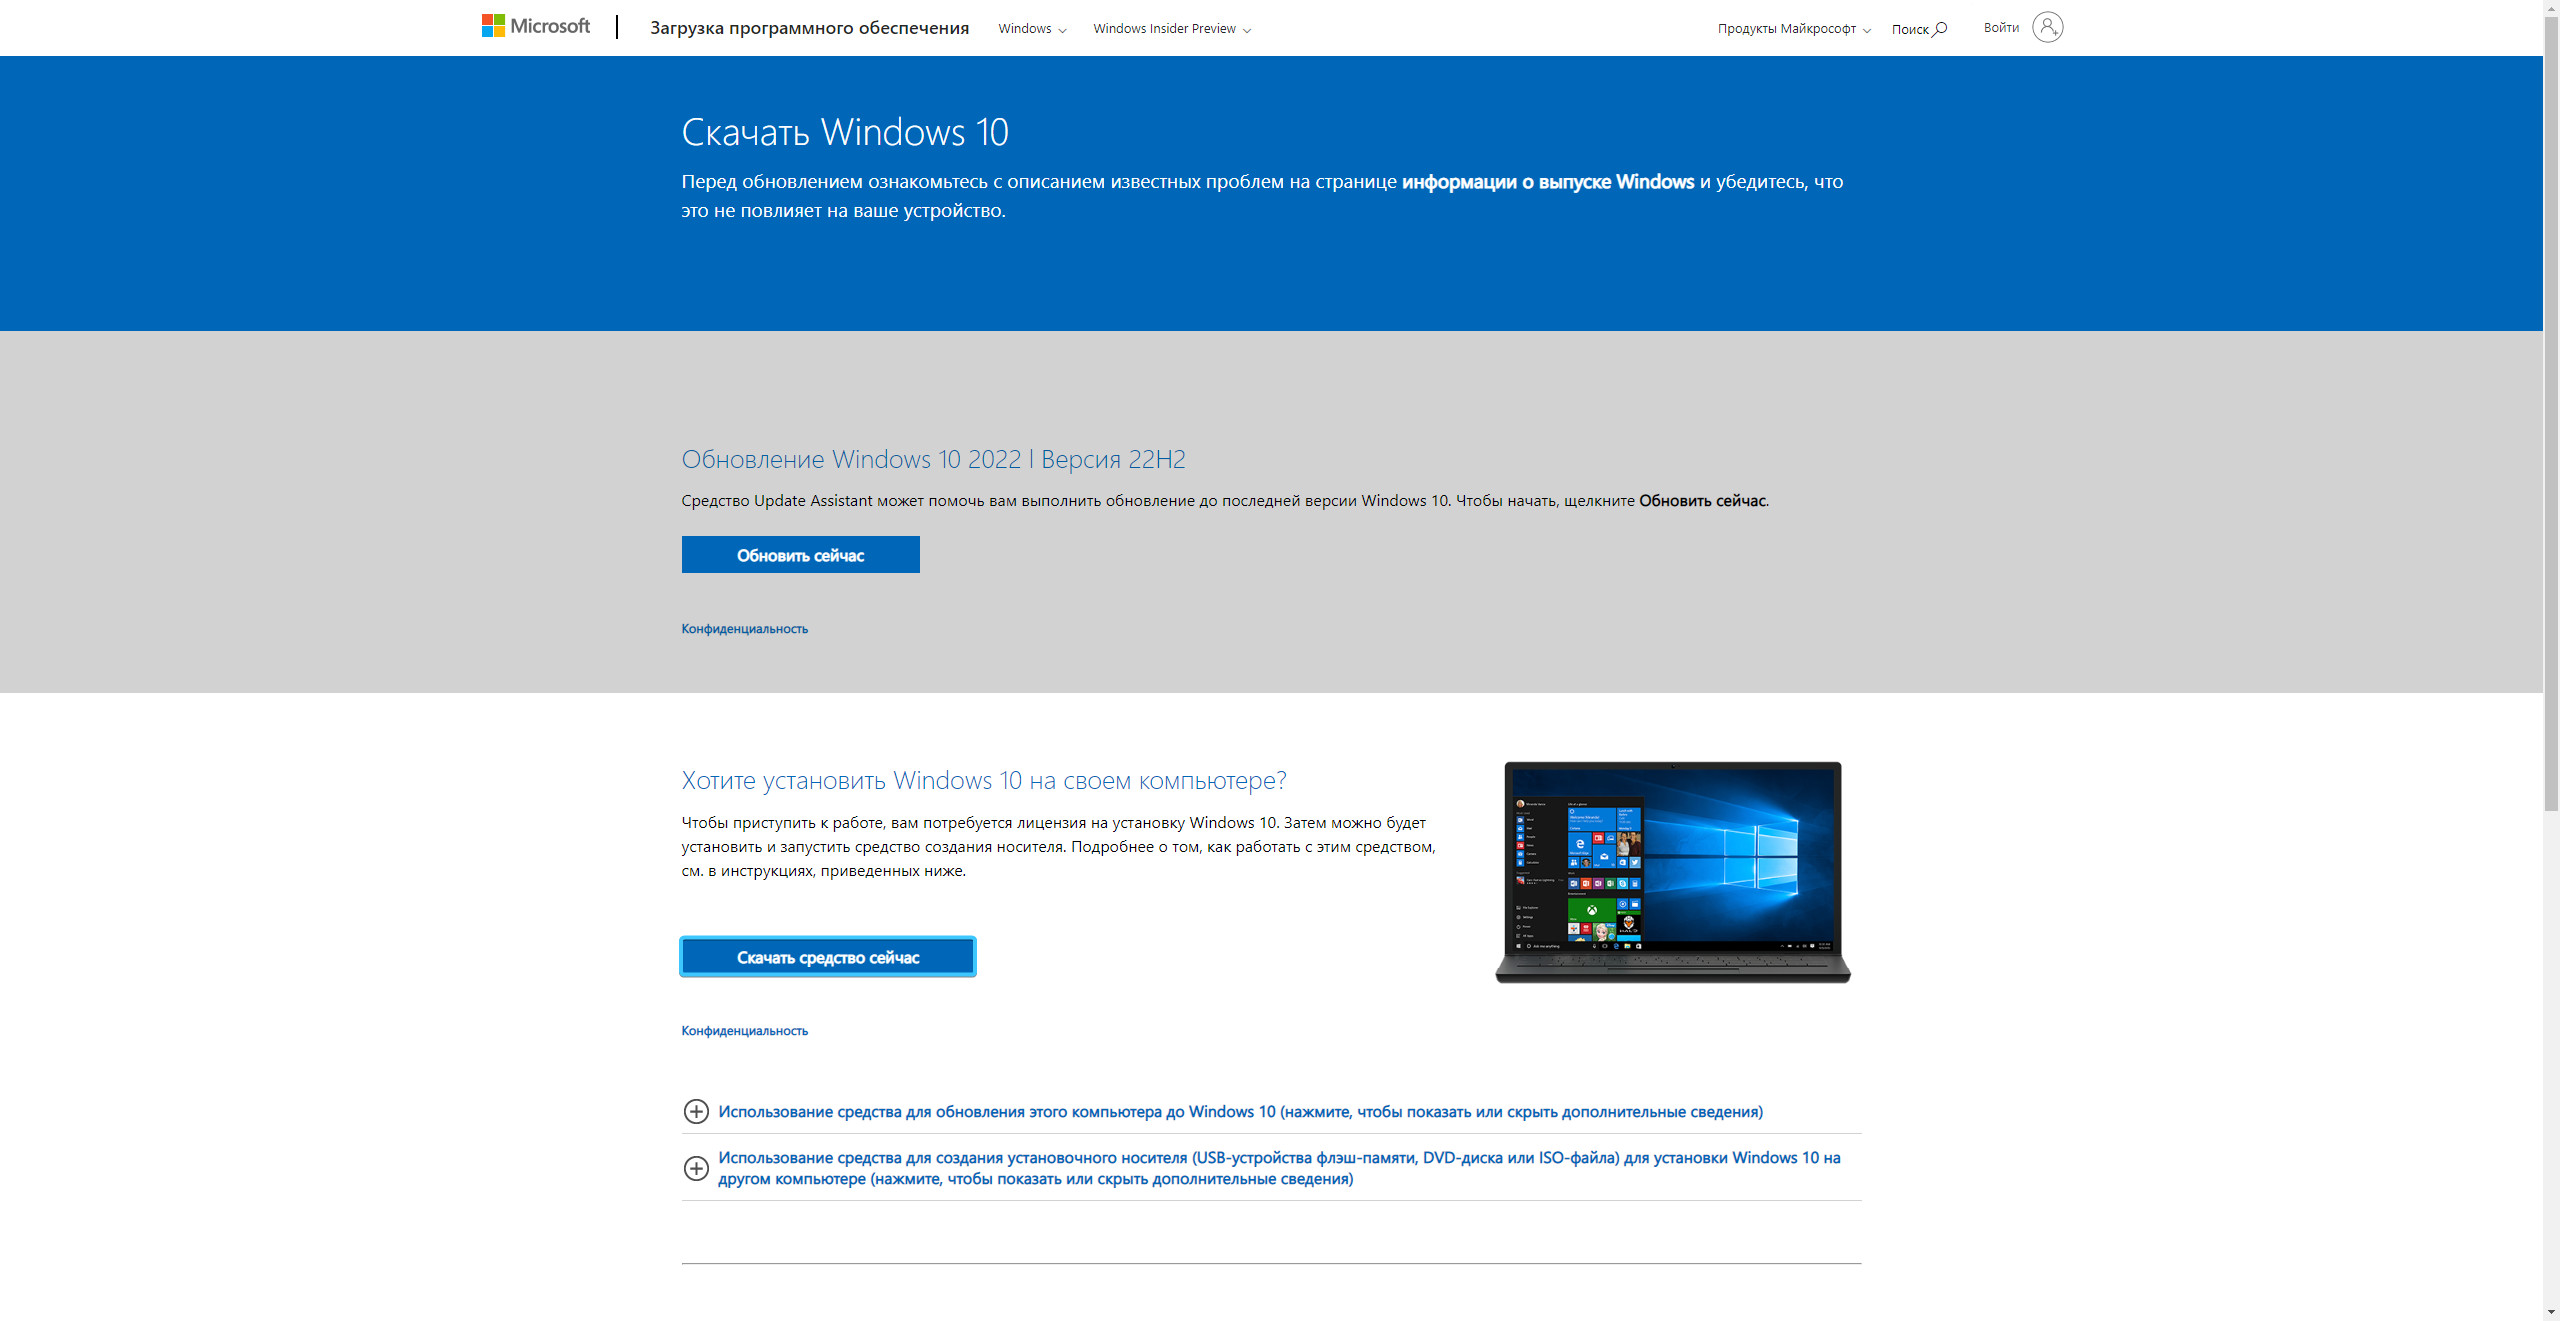
1. Перейдите на официальный сайт корпорации «Microsoft» и нажмите кнопку «Скачать средство сейчас».
2. Запустите приложение «Media Creation Tool» и дождитесь завершения процесса подготовки.

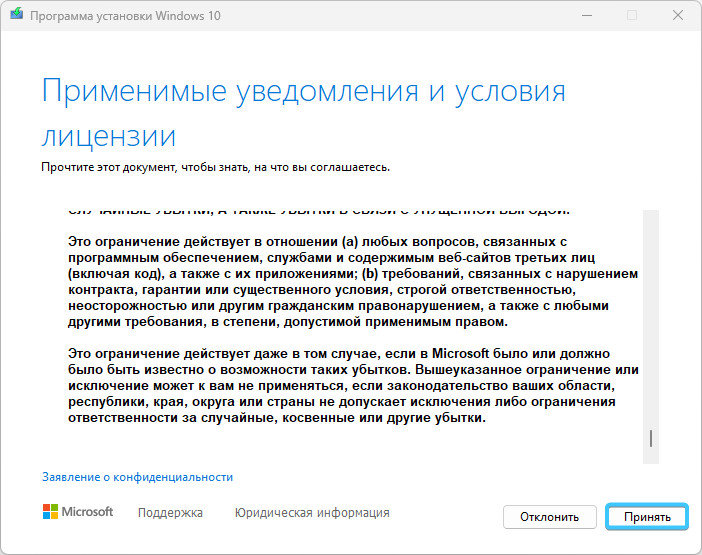
3. Ознакомьтесь с лицензионным соглашением и нажмите кнопку «Принять» для продолжения.
4. Вновь дождетесь завершения процесса подготовки, он может занять некоторое время.

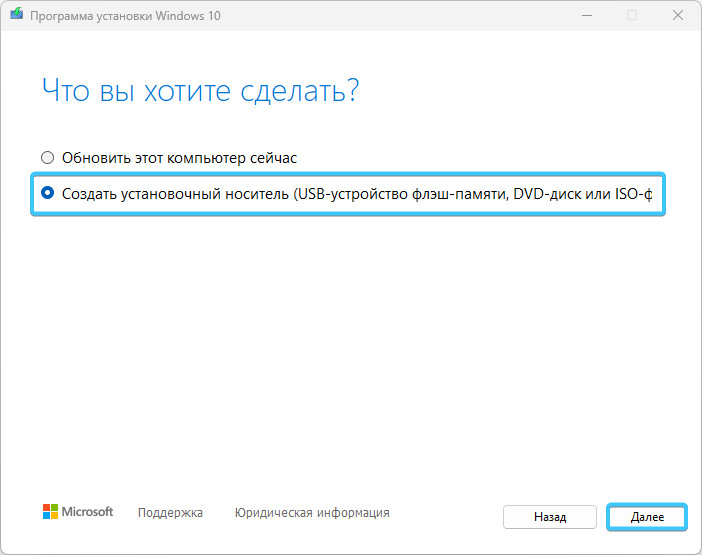
5. Выберите пункт «Создать установочный носитель» и нажмите кнопку «Далее».
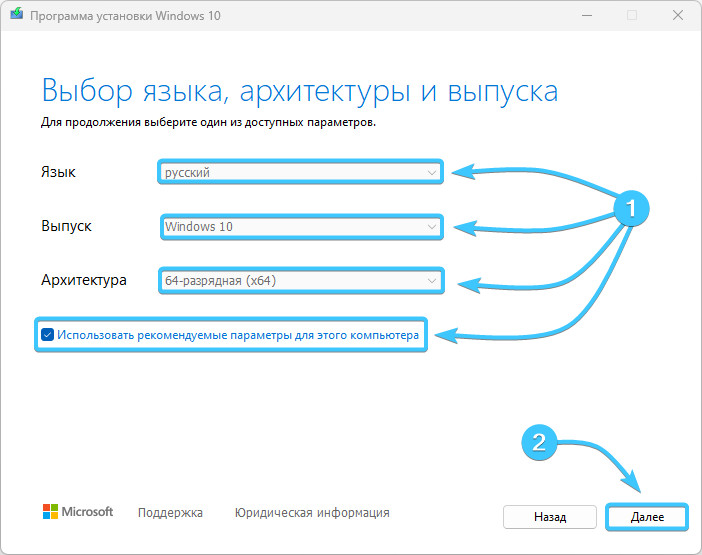
6. Если вы хотите установить операционную систему на текущем устройстве, то вам необходимо поставить галочку «Использовать рекомендованные параметры для этого компьютера». Если вы создаёте установочный носитель для другого устройства, то снимите данную галочку, ознакомьтесь с характеристиками этого устройства и выберите необходимые параметры. Нажмите кнопку «Далее».
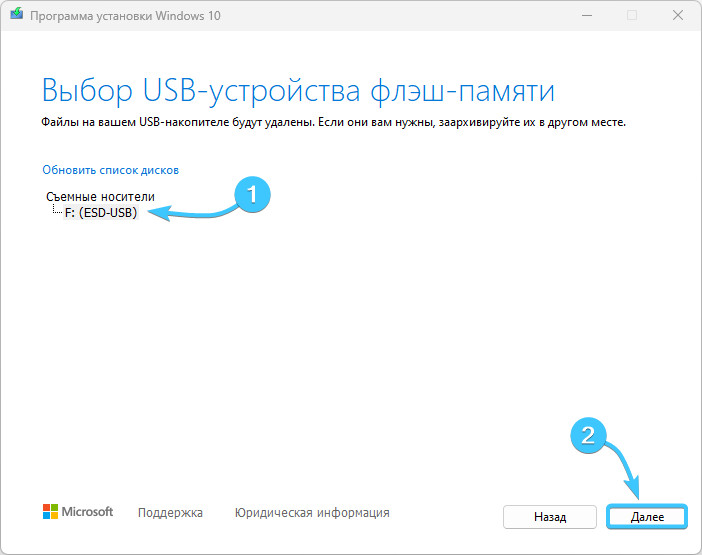
7. Вставьте носитель в устройство. Выберите «USB-устройство флэш-памяти» и нажмите кнопку «Далее».

8. Выберите носитель, на который будет установлен образ «Windows 10» и нажмите кнопку «Далее».
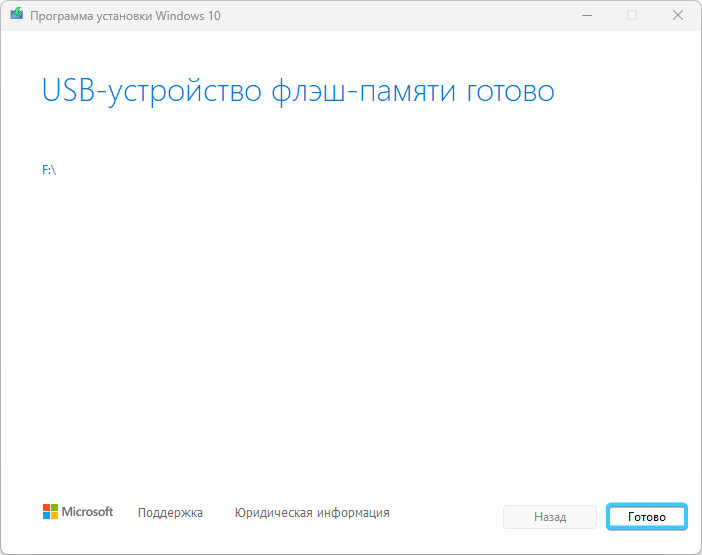
9. Начнётся процесс создания установочного носителя «Windows 10». Дождитесь его завершения.

10. Установочный носитель успешно создан. Нажмите кнопку «Готово» для закрытия данного окна.
Установка операционной системы «Windows 10»
1. Вставьте готовый носитель с образом «Windows 10» в устройство. Включите, либо же перезагрузите устройство. Во время запуска нажмите соответствующую кнопку для открытия «BIOS». Она должна быть показана внизу экрана при включении устройства, либо же вы можете посмотреть её в интернете.
2. В «BIOS» отыщите раздел, отвечающий за загрузку устройств. Выставите носитель с образом «Windows 10» на первое место в списке загрузки. Сохраните изменения в «BIOS» и перезагрузите устройство.

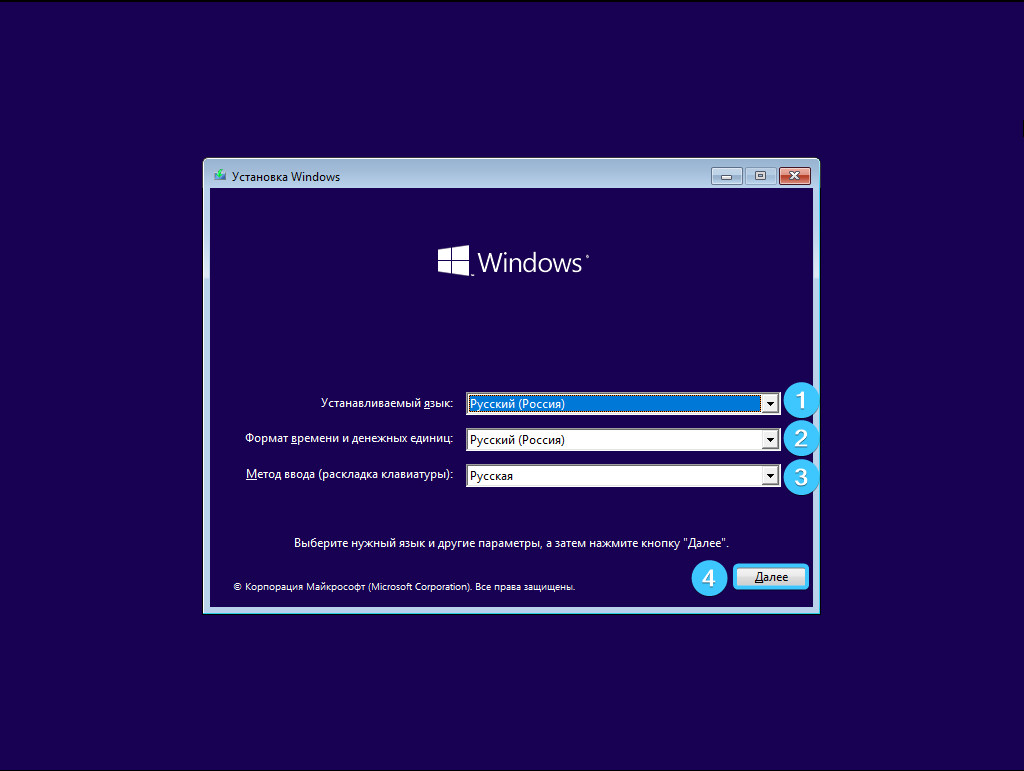
3. Если вы правильно выставили устройство загрузки в «BIOS», то после перезагрузки появится меню для установки «Windows 10». Выберите следующие параметры: устанавливаемый язык (1), формат времени и денежных единиц (2), раскладку клавиатуры (3). Нажмите кнопку «Далее» для продолжения (4).
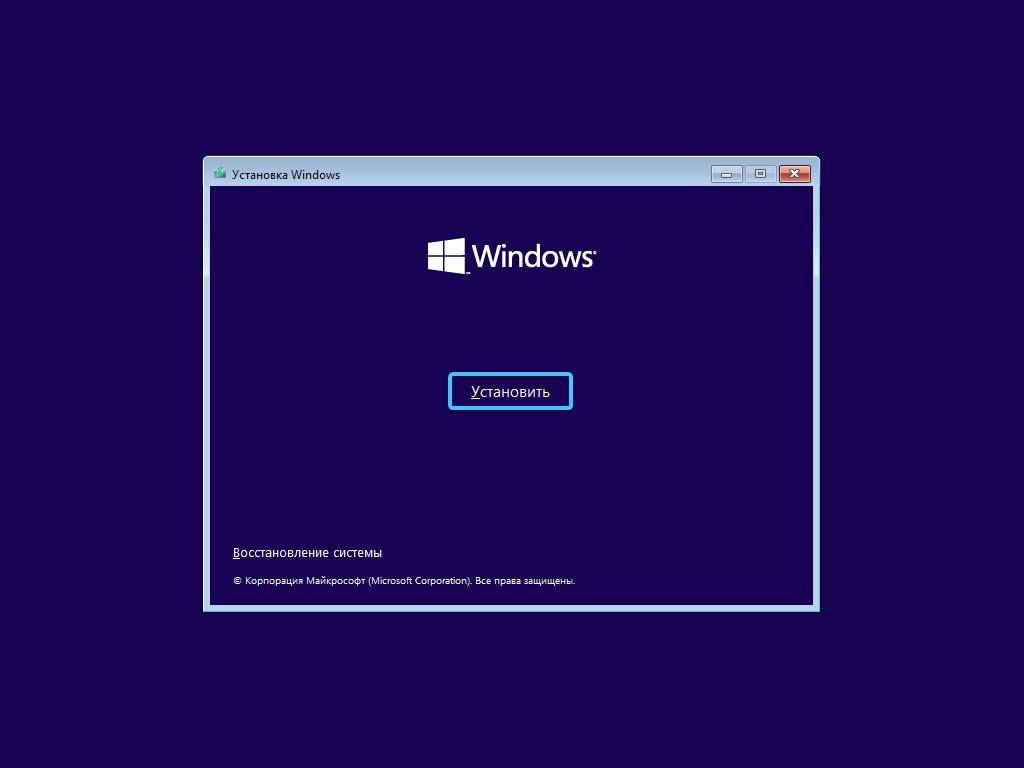
4. Появится новое окно. Нажмите кнопку «Установить» для продолжения процесса установки.
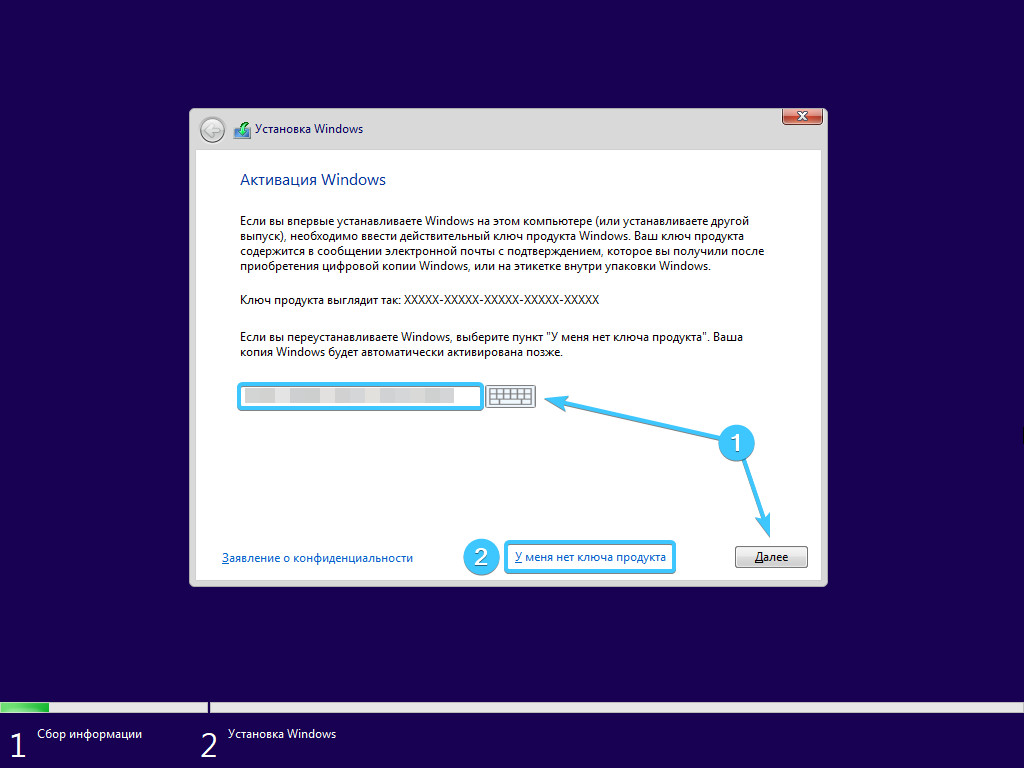
5. Вас попросят ввести лицензионный ключ продукта. Сделайте это, если он у вас имеется и нажмите кнопку «Далее» (1). Если он у вас отсутствует, то нажмите кнопку «У меня нет ключа продукта» (2).
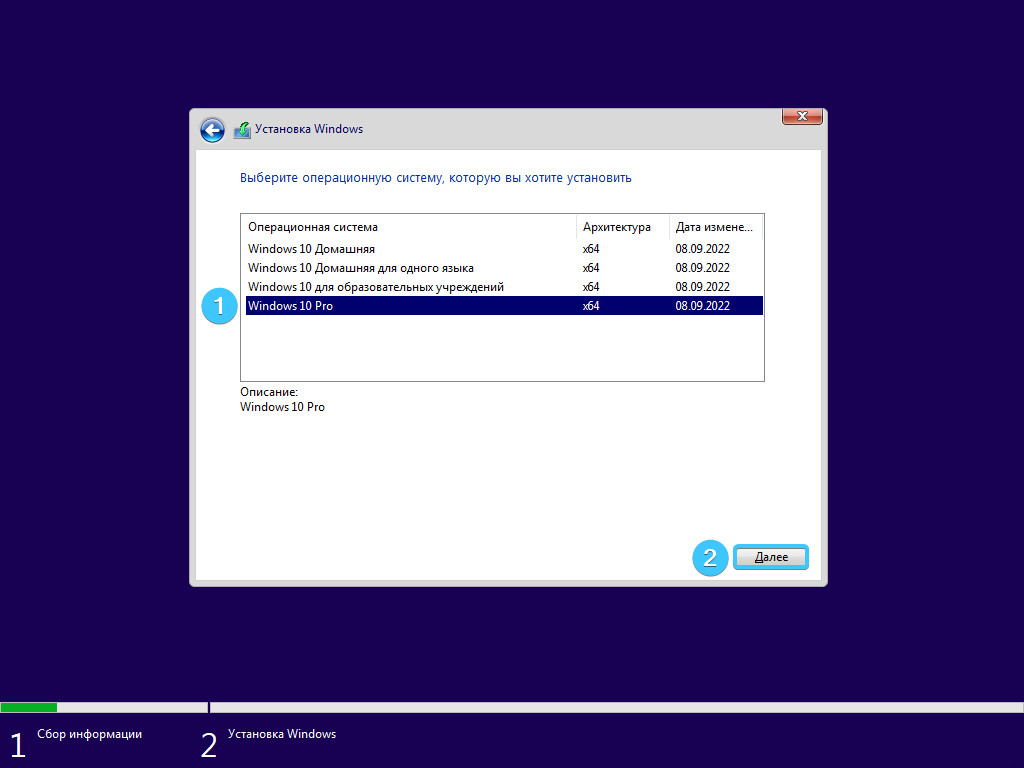
6. Выберите редакцию операционной системы «Windows 10», которую вы хотели бы установить. Мы рекомендуем устанавливать редакции «Pro» или «Домашняя». После выбора нажмите кнопку «Далее».
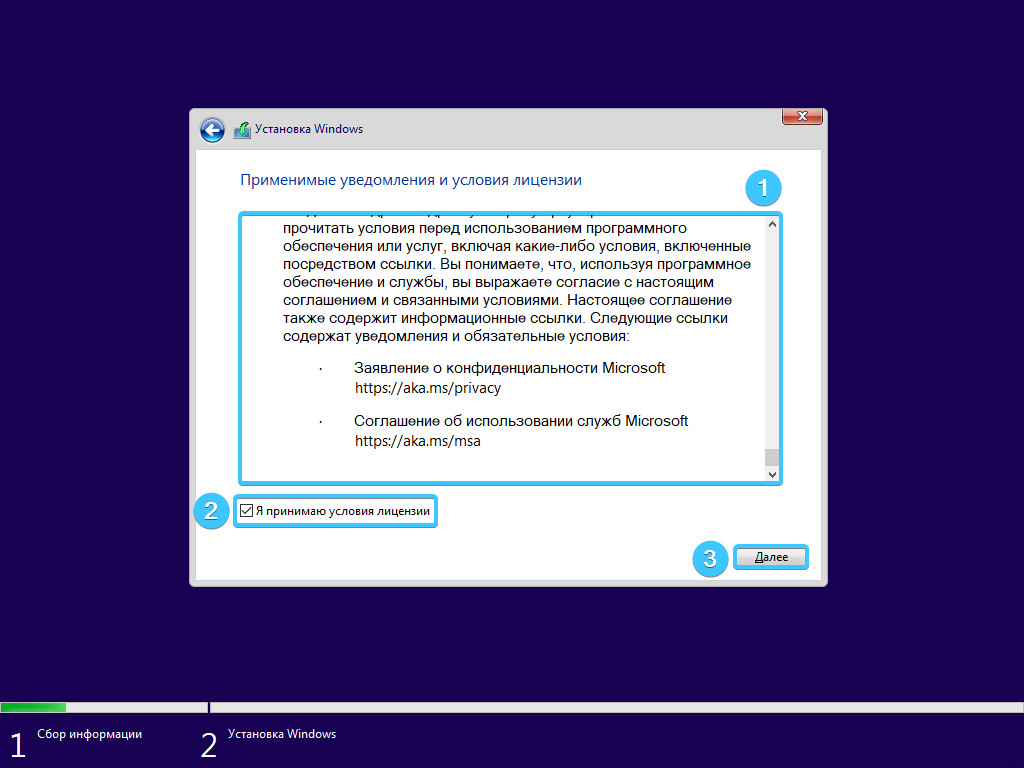
7. Ознакомьтесь с лицензионным соглашением операционной системы «Windows 10». После этого поставьте галочку возле пункта подтверждения и нажмите кнопку «Далее» для продолжения установки.
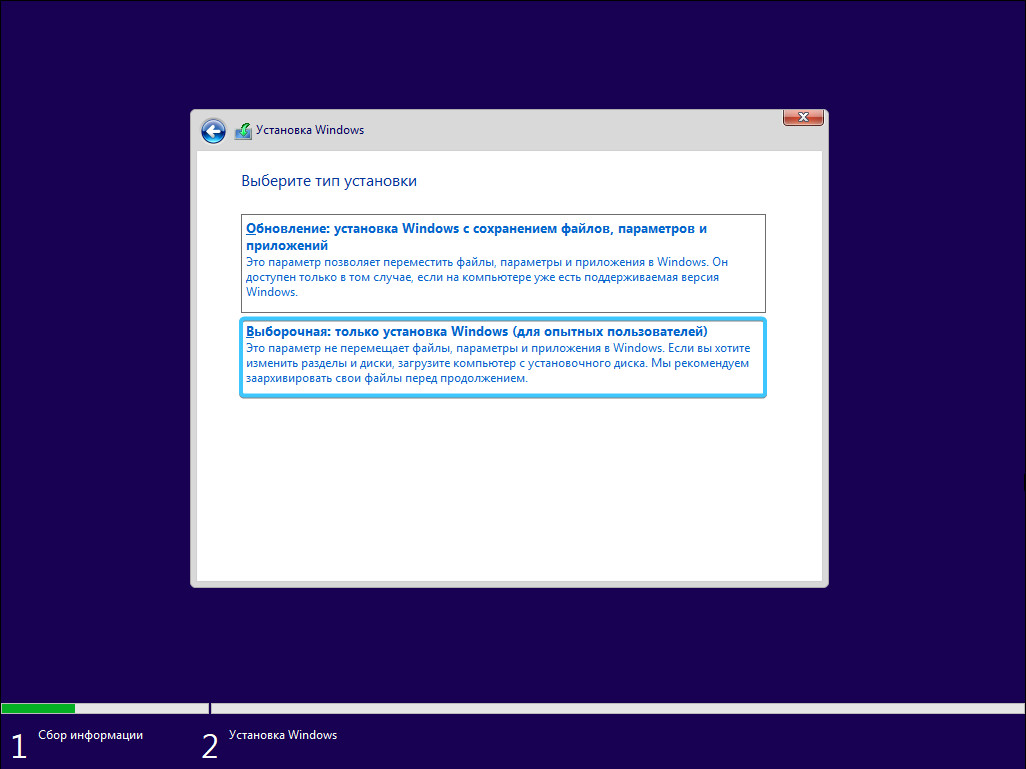
8. Выберите тип установки «Выборочная: только установка Windows (для опытных пользователей)».
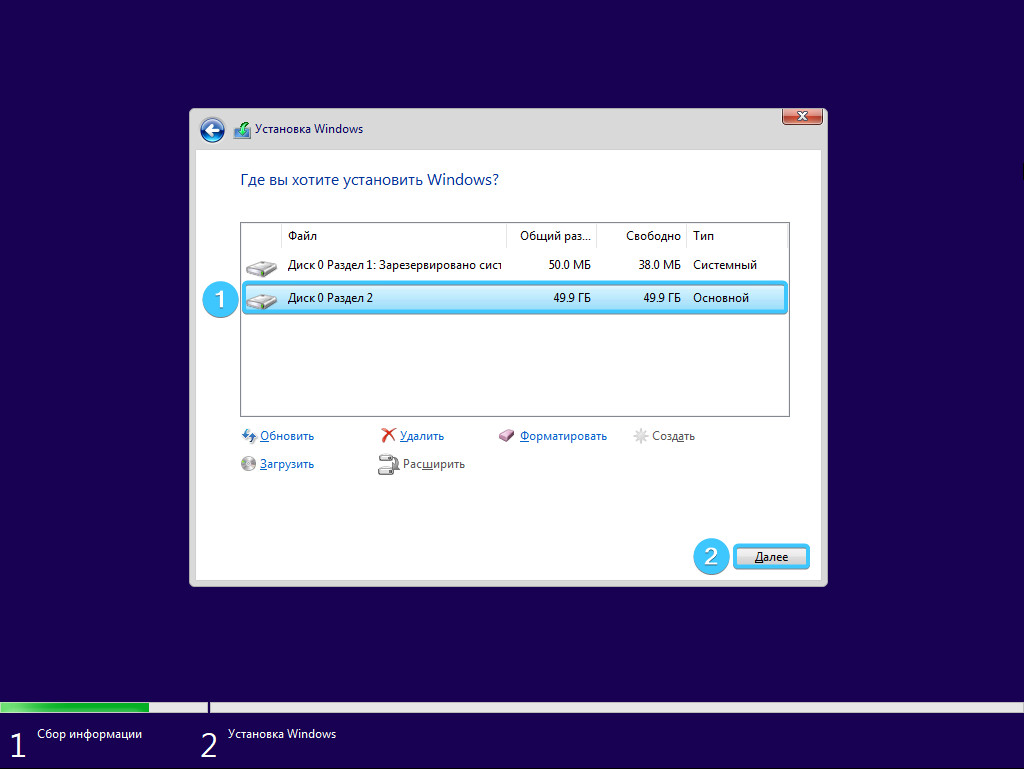
9. Далее вы попадёте в меню разделения дискового пространства. Если у вас не полностью новый «SSD» или «HDD», то вы увидите больше разделов, чем видели обычно в проводнике. Рекомендуется полностью удалить все разделы и определить, сколько у вас будет незанятого места в итоге. После этого необходимо произвести разделение дискового пространства. Тут всё зависит от того, какое количество разделов вам необходимо. Мы рекомендуем поступать следующим образом: один диск = один раздел. Если у Вас имеется «SSD», то устанавливать операционную систему необходимо на него. По завершении разделения нажмите на раздел, на который будет установлена «Windows 10» и нажмите кнопку «Далее».
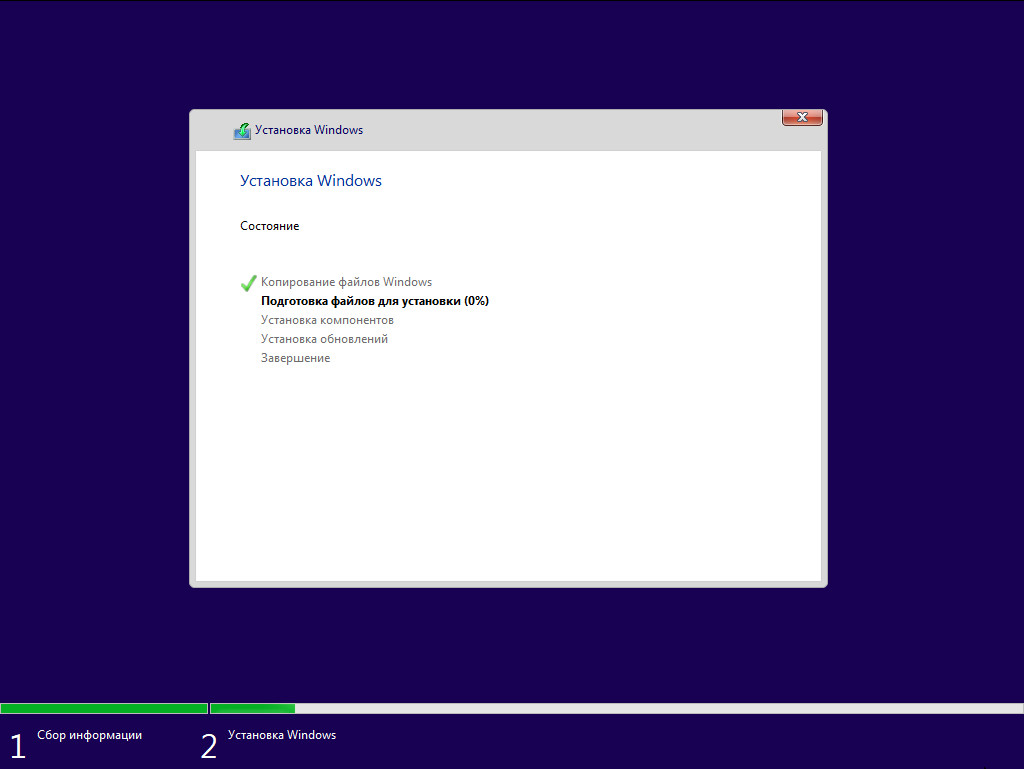
10. После успешного разделения дисков начнётся процесс установки операционной системы «Windows 10», устройство несколько раз перезагрузится. Дождитесь завершения всех процессов установки.
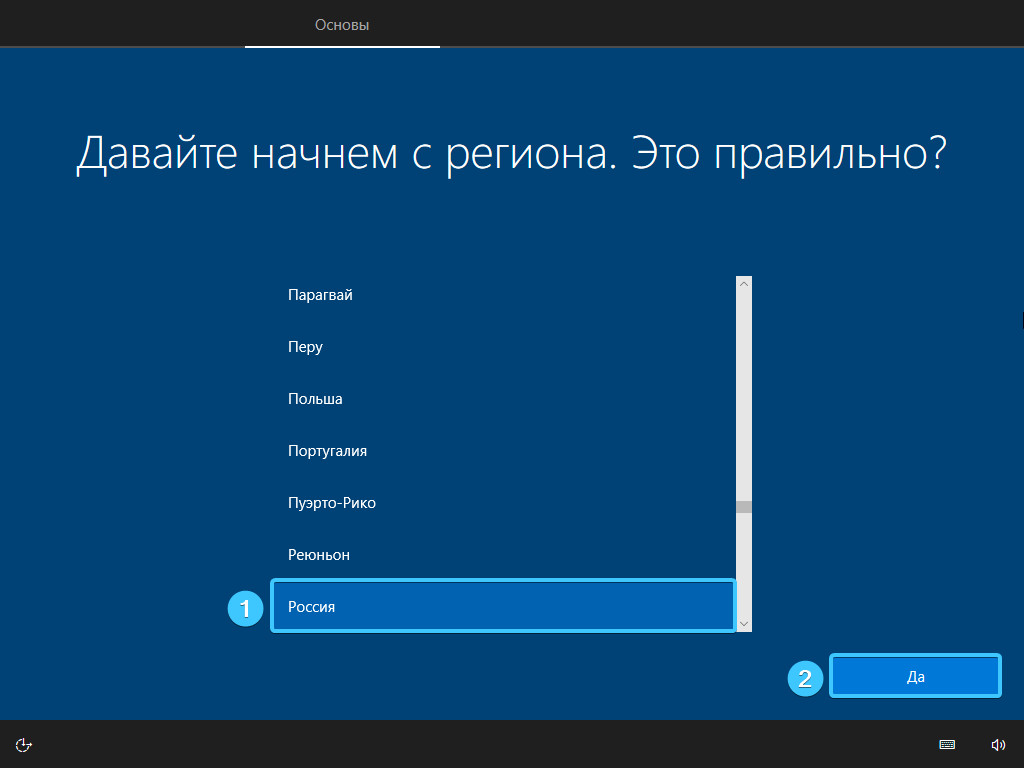
11. Произведите первичную настройку «Windows 10». Выберите регион и нажмите кнопку «Да».
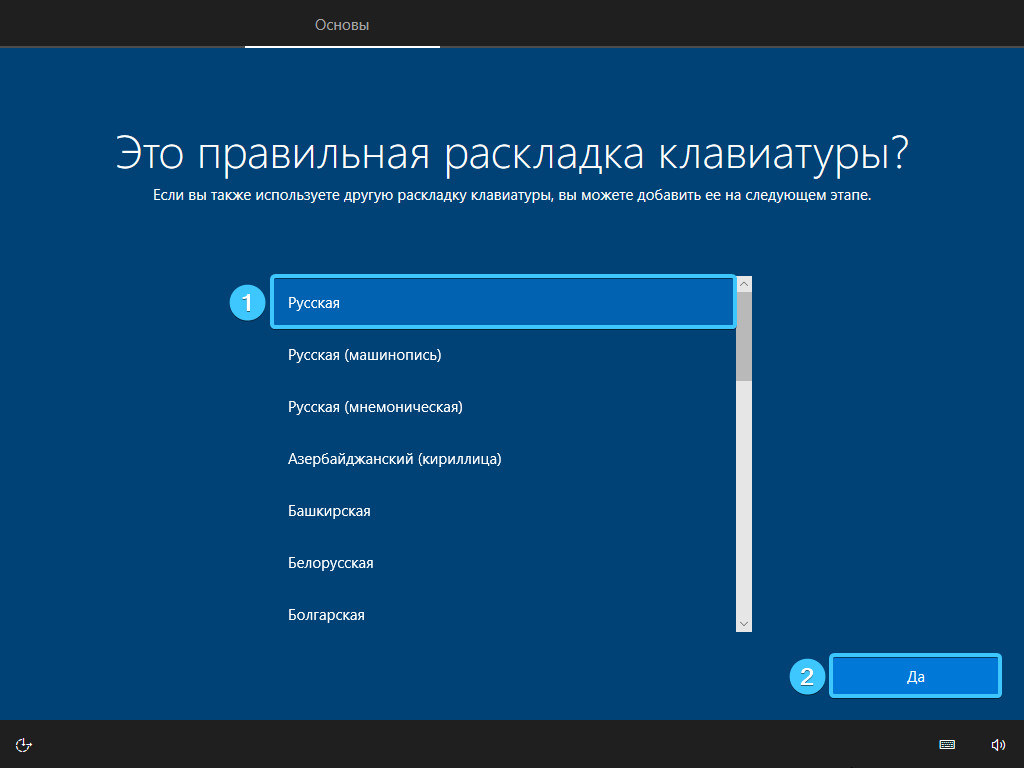
12. Выберите необходимую раскладку клавиатуры или способ ввода. Нажмите кнопку «Да».
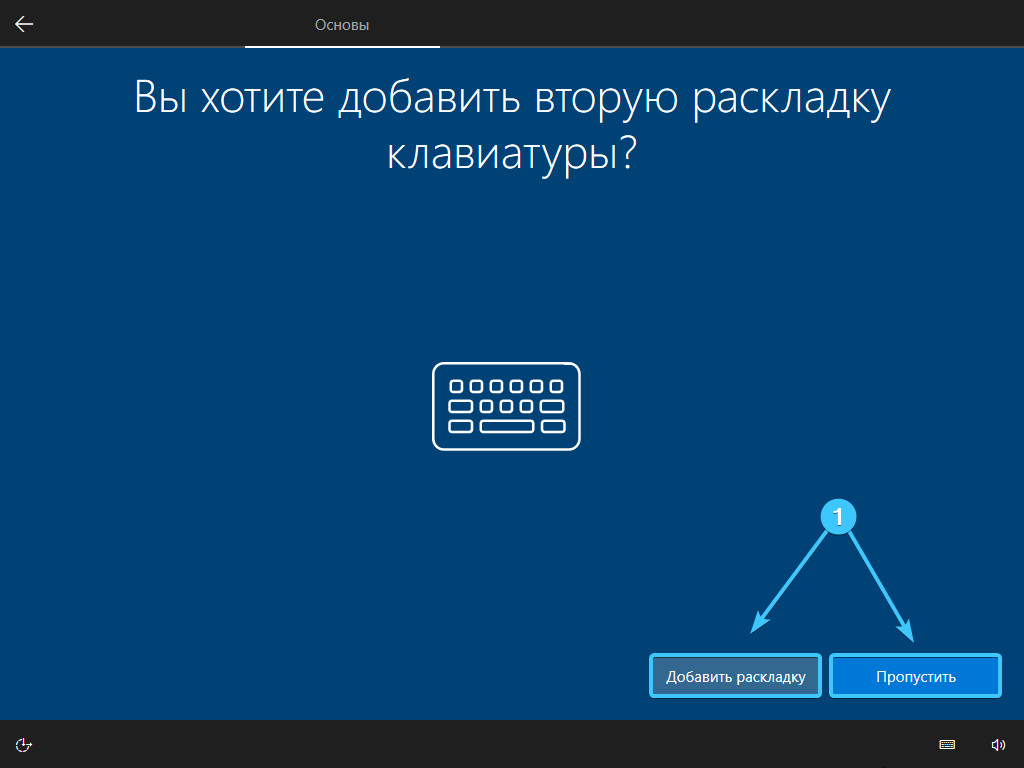
13. Нажмите кнопку «Пропустить», если вам не требуется дополнительная раскладка клавиатуры.
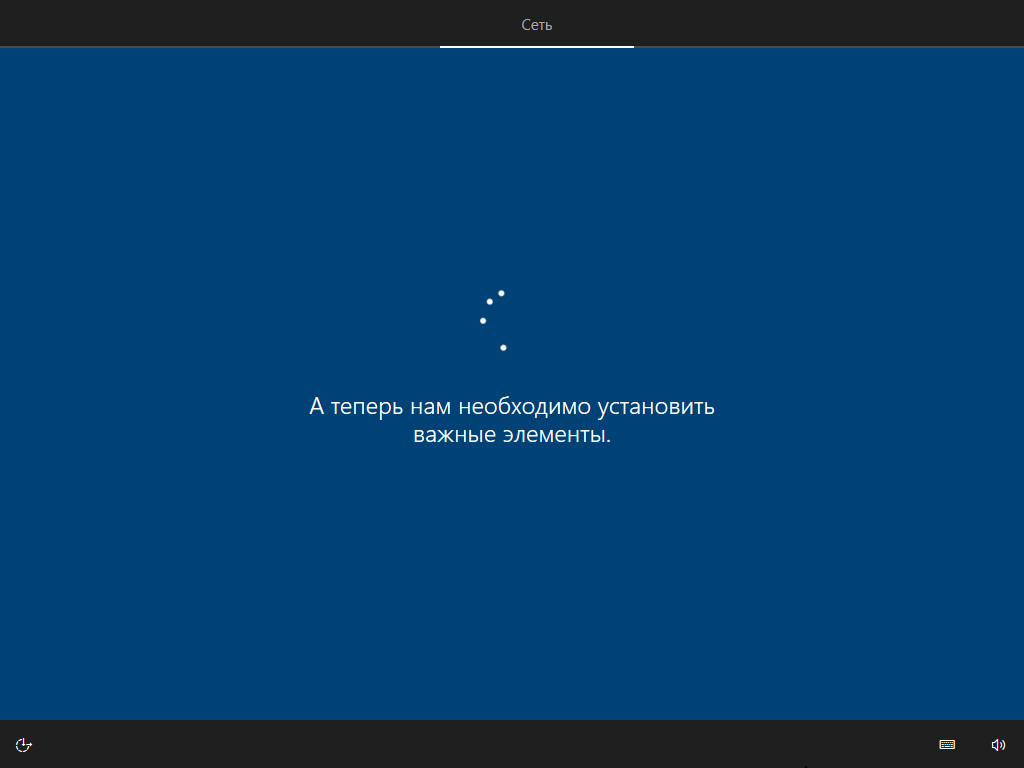
14. Начнётся проверка наличия обновлений. Она может занять некоторое время.
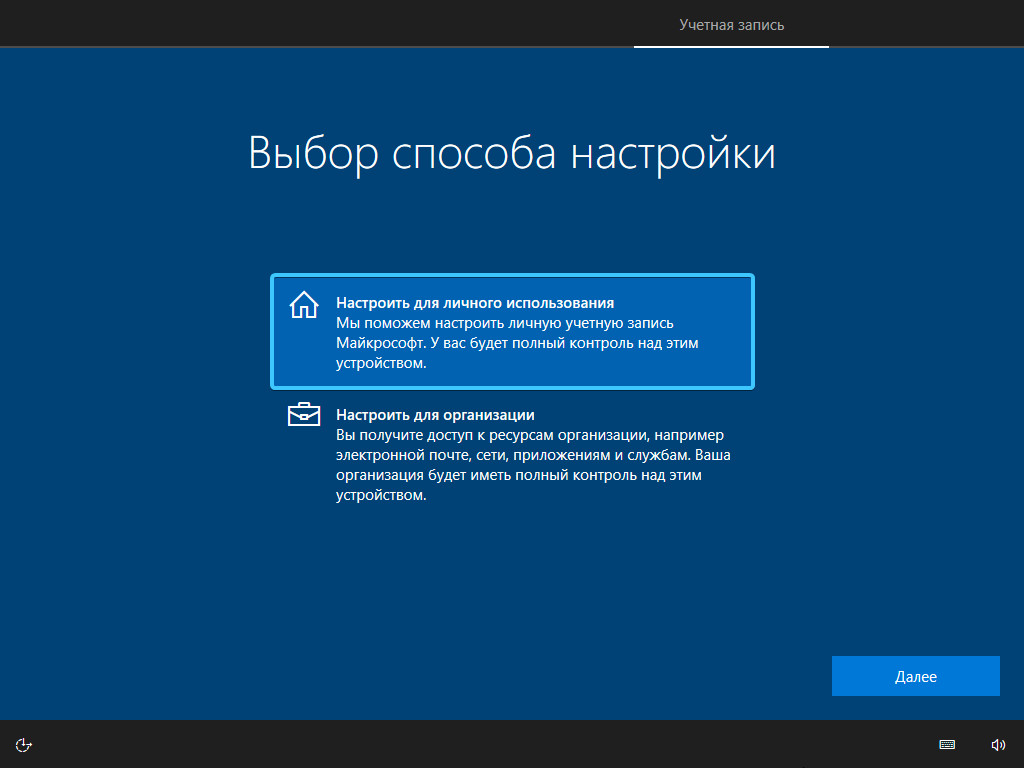
15. После перезагрузки устройства выберите способ «Настроить для личного использования».
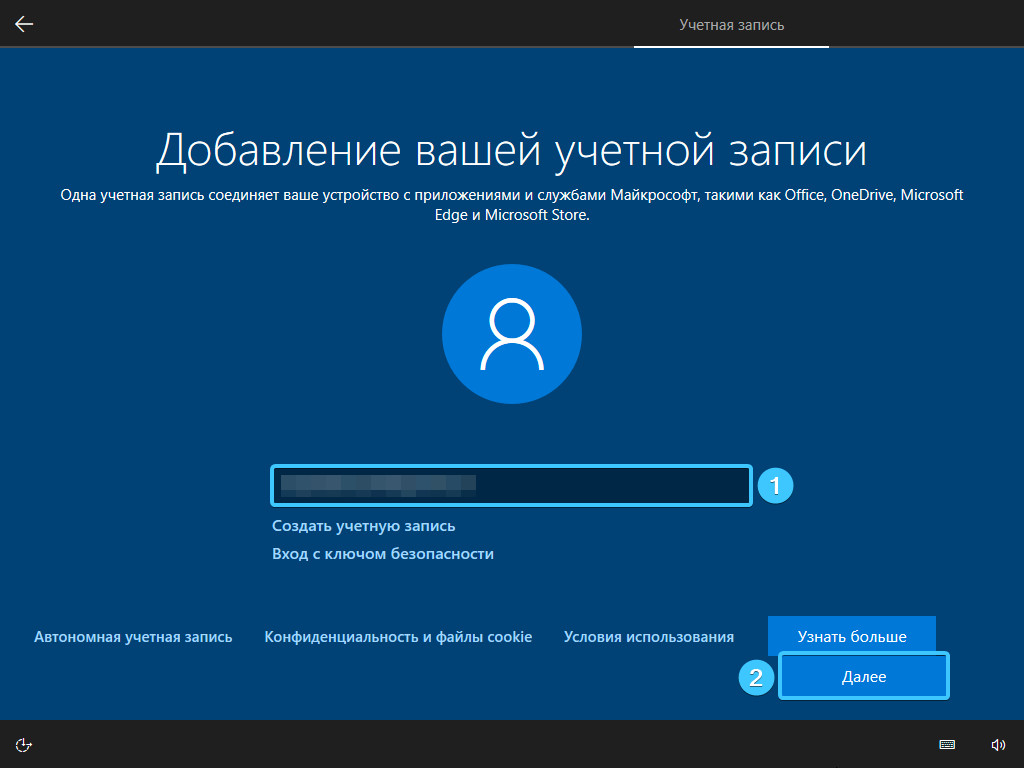
16. Авторизуйтесь при помощи учётной записи «Microsoft». Если у Вас её нет — создайте её прямо там;
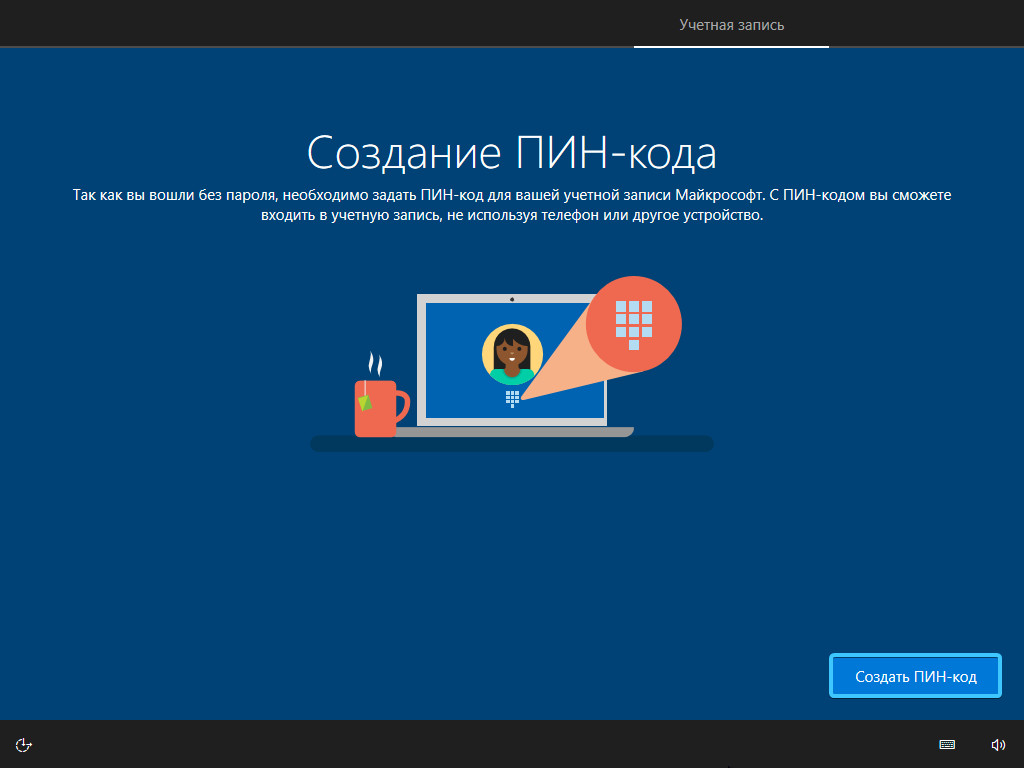
17. Система предложит установить пин-код в целях безопасности. Нажмите кнопку «Создать ПИН-код».
18. Введите пин-код, затем повторите его. Нажмите кнопку «ОК» для продолжения настройки системы.

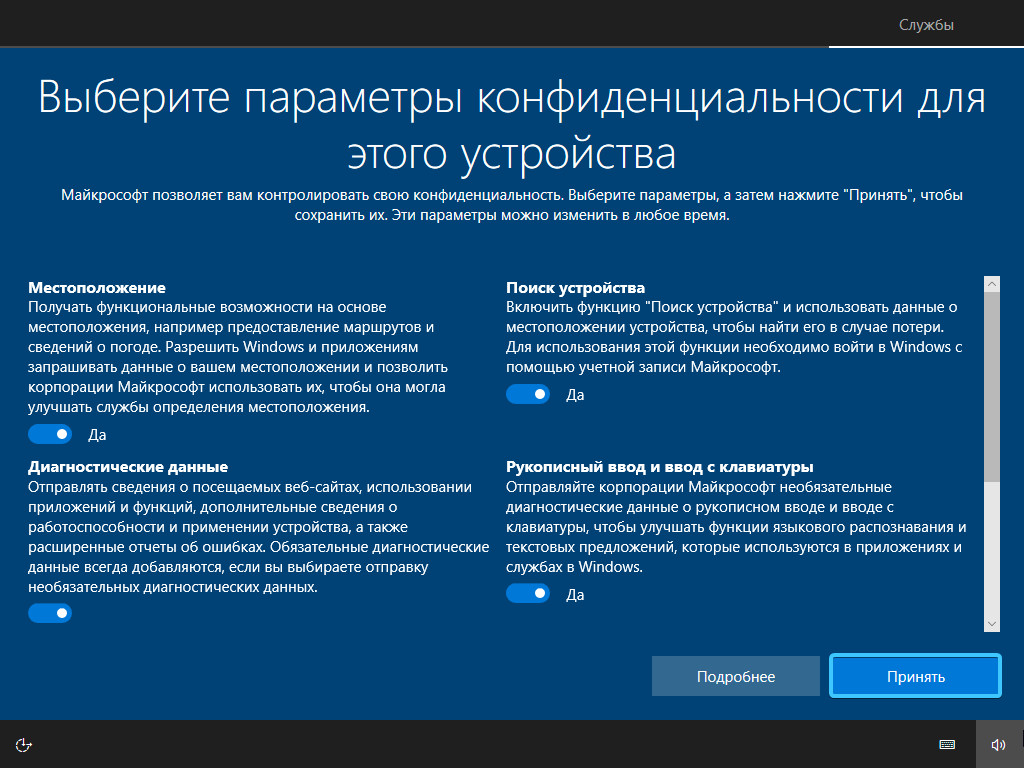
19. Ознакомьтесь с параметрами конфиденциальности и настройте их. Нажмите кнопку «Принять».
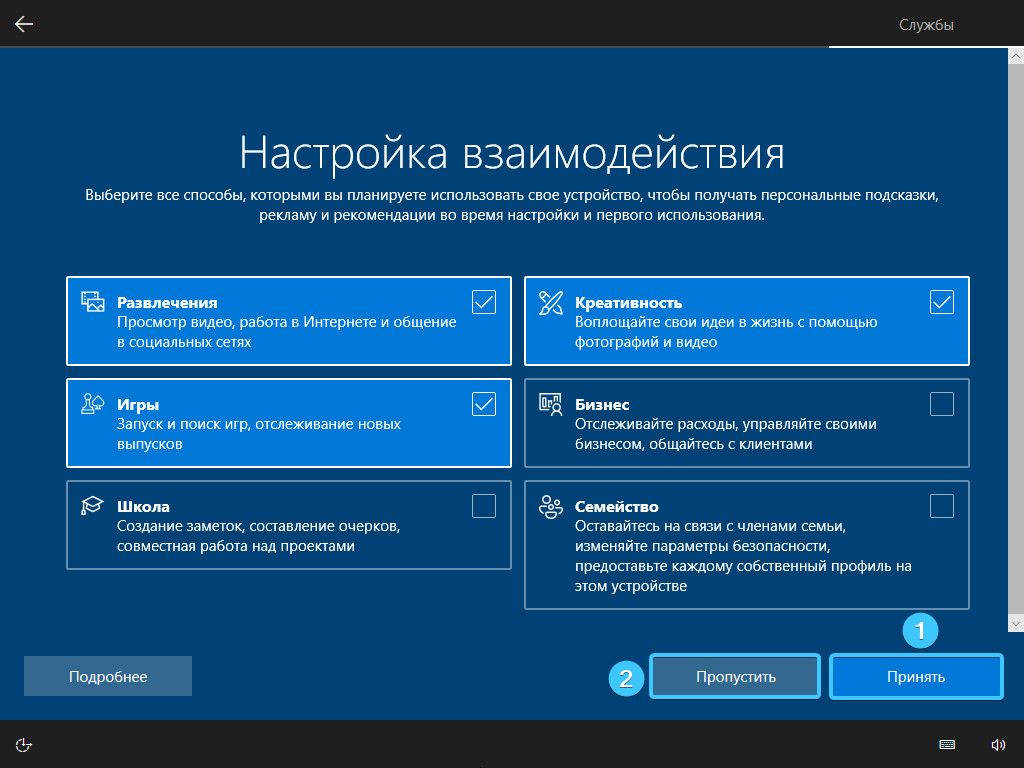
20. Ознакомьтесь со способами взаимодействия с устройством. Выберите нужные пункты и нажмите кнопку «Принять» (1). В случае, если вы не хотите этого делать — нажмите кнопку «Пропустить» (2).
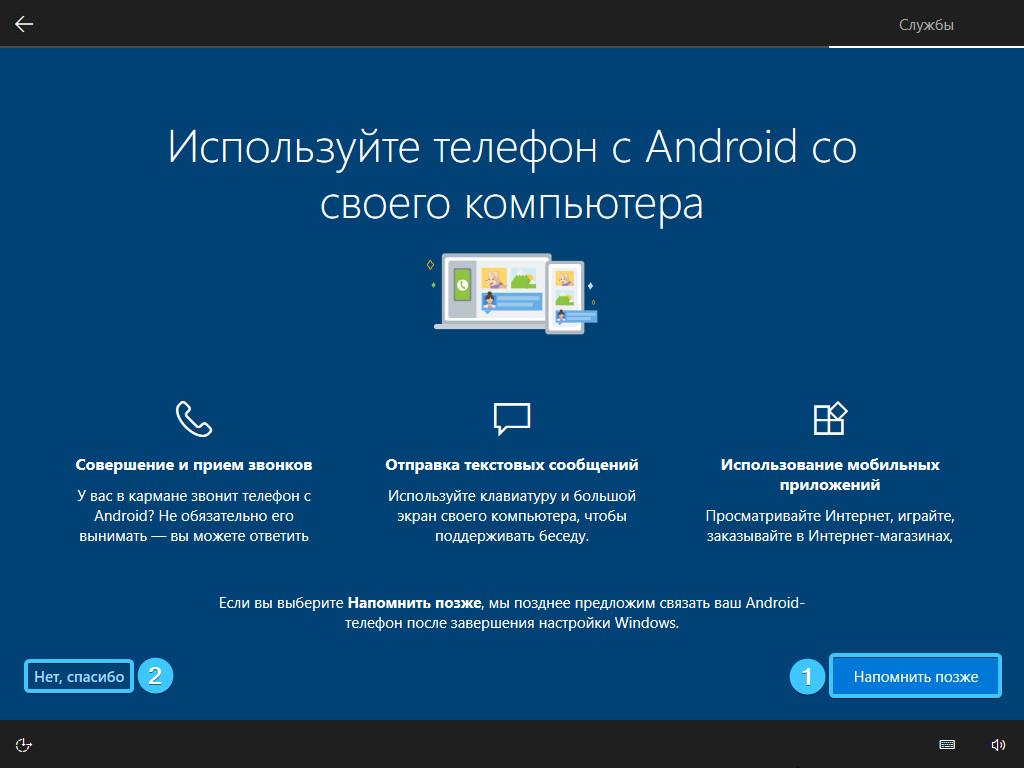
21. Система предложить привязать телефон. Нажмите кнопку «Напомнить позже» (1) или «Нет, спасибо» (2).
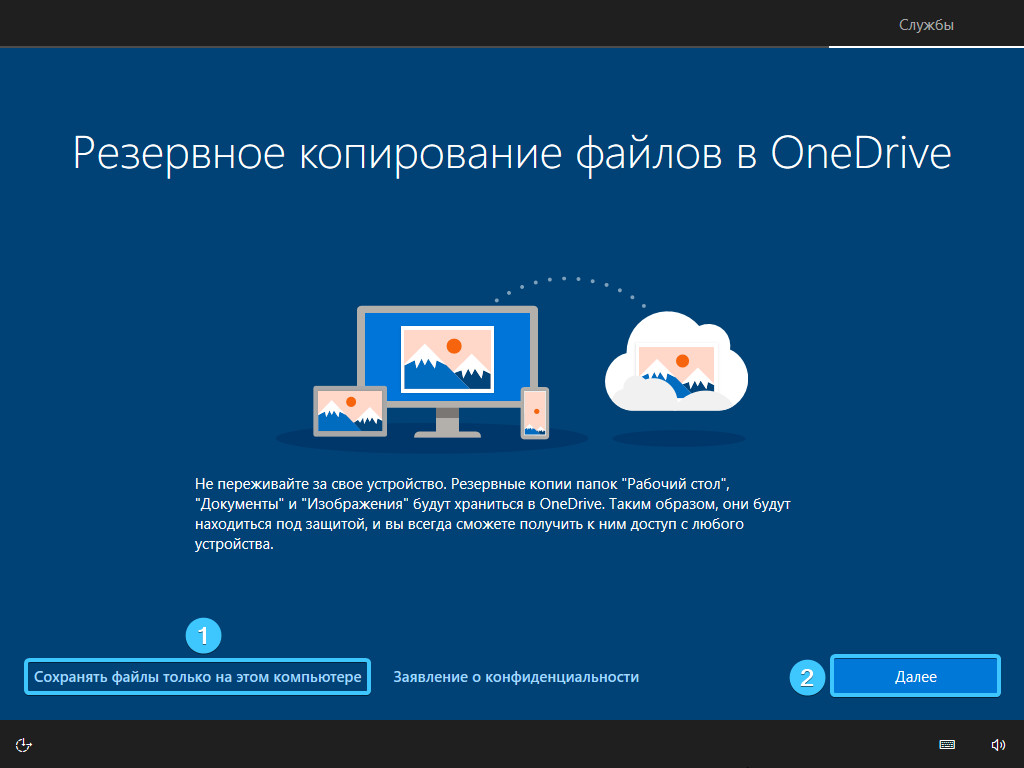
22. Выберите тип резервного копирования файлов. Нажмите кнопку «Далее», если Вы хотите использовать «OneDrive». Если нет, то нажмите кнопку «Сохранять файлы только на этом компьютере».
23. Появится рабочий стол. Операционная система «Windows 10» установлена, ей можно пользоваться.
Рекомендации после установки «Windows 10»
После установки операционной системы «Windows 10» рекомендуется сделать следующее:
- Установить все последние обновления при помощи раздела «Центр обновления Windows»;
- Установить все последние драйверы, скачав их с официального сайта материнской платы;
- Установить последние драйверы на видеокарту, скачав их с официального сайта производителя.
Другие руководства
- Переключение технологии «DEP»;
- Настройка файла подкачки;
- Диагностика оперативной памяти;
- Диагностика дисковых устройств;
- Режимы питания в «Windows 11»;
- Отключение компонента «Hyper-V»;
- Установка системы «Windows 11»;
- Обновление системы «Windows»;
- Отключение загрузки приложений;
- Добавление схем электропитания;
- Коррекция времени «Windows»;
- Отключение изоляции ядра;
- Удаление приложений в системе;
- Отключение визуальных эффектов;
- Отчёты «MSInfo32» и «DxDiag»;
- Отключение индексации диска;
- Оптимизация дискового устройства;
- Проверка целостности «Windows»;
- Удаление среды «Java options»;
- Восстановление системных шрифтов;
- Отключение параметра отладки;
- Расположение списка приложений;
- Режимы питания в «Windows 10»;
- Отключение удалённого помощника;
- Сброс операционной системы;
- Активация операционной системы;
- Включение контроля памяти;
- Очистка операционной системы;
- Приостановка обновлений системы.